Hardy Hibiscus Flower Color Enhancement: Soil pH Tricks for Vibrant Blooms
I’ve always been captivated by the stunning, dinner-plate-sized blooms of my hardy hibiscus. But for years, I felt a pang of disappointment. The colors on the plant tags promised vibrant, saturated magentas and deep, velvety reds, yet my garden often delivered something more muted—washed-out pinks or less intense shades. I knew the plants were healthy; they grew tall and leafy. The issue, I discovered, wasn't with fertilizer or sunlight alone. The secret to unlocking those jaw-dropping, intense flower colors I craved lay beneath the surface, in the chemistry of the soil itself. This realization sent me down a path of experimentation focused on one key factor: hardy hibiscus flower color enhancement through precise soil pH management. Let me walk you through the exact steps I took, the two-week transformation I witnessed, the mistakes I made along the way, and how you can achieve the same spectacular results.
Understanding the Science: Why Soil pH Dictates Flower Color

Before I grabbed any tools, I needed to understand the "why." The intensity and sometimes even the hue of hardy hibiscus blooms are profoundly influenced by soil pH—a measure of how acidic or alkaline your soil is. This isn't just gardening folklore. The Royal Horticultural Society (RHS) notes that soil pH affects the availability of essential nutrients. Specifically, for flower color, the key player is aluminum.
In moderately to strongly acidic soils (lower pH), aluminum becomes more soluble and available for plant uptake. Many hardy hibiscus varieties, particularly those in the red, blue, and purple spectrum, use this available aluminum to form complexes with pigments called anthocyanins. This process deepens and enriches the color. In neutral or alkaline soils (higher pH), aluminum gets "locked up," becoming inaccessible. The plant can't utilize it, resulting in paler, less vivid flowers. My goal became clear: I needed to gently nudge my soil into the ideal slightly acidic range of 5.5 to 6.5 to maximize color potential.
My Two-Week Soil pH Adjustment Experiment: A Step-by-Step Journal
I selected two established 'Midnight Marvel' hibiscus plants, known for its deep red foliage and rich red flowers. Both were healthy but had been producing good, but not great, red blooms. This would be my real-world test.
Week 1: Assessment and Initial Adjustment
Day 1: The Baseline Test. Assumptions are the enemy of a gardener. I used a reliable digital pH meter and a separate test kit to check the soil around both plants. The result? A pH of 7.1—just on the alkaline side of neutral. This confirmed my theory: the aluminum my plants needed was likely unavailable.
Day 2: Choosing My Amendment. To lower pH (increase acidity), common options are elemental sulfur and aluminum sulfate. The American Hibiscus Society (AHS) provides clear guidance: elemental sulfur is slower-acting but longer-lasting, as soil microbes convert it to sulfuric acid. Aluminum sulfate acts faster because it directly adds aluminum and acidity immediately. For my color enhancement experiment, I chose aluminum sulfate for its dual action and quicker results. Important Note: Always follow package rates based on soil type. Over-application can harm plants.
Day 3: Application. I carefully measured the recommended amount for my plant's size. I watered the soil thoroughly a few hours before application to prevent root shock. Then, I sprinkled the granules evenly around the drip line (the area under the outermost branches), gently scratched them into the top inch of soil, and watered deeply again to help the amendment begin to seep down to the root zone.
Days 4-7: Observation and The First "Oops." I monitored daily. By Day 5, I noticed the tips of a few leaves on one plant looked slightly scorched. I had made my first mistake: I applied the granules directly onto damp foliage during my evening gardening session. The residue burned the leaves. Solution: I immediately rinsed the foliage with a gentle spray of water. For future applications, I will be meticulous about applying only to soil. Lesson learned.
Week 2: Monitoring and the First Signs of Change
Days 8-10: No dramatic above-ground changes yet, but that was expected. The real work was happening at the root level. I resisted the urge to test the pH again too soon; these changes need time.
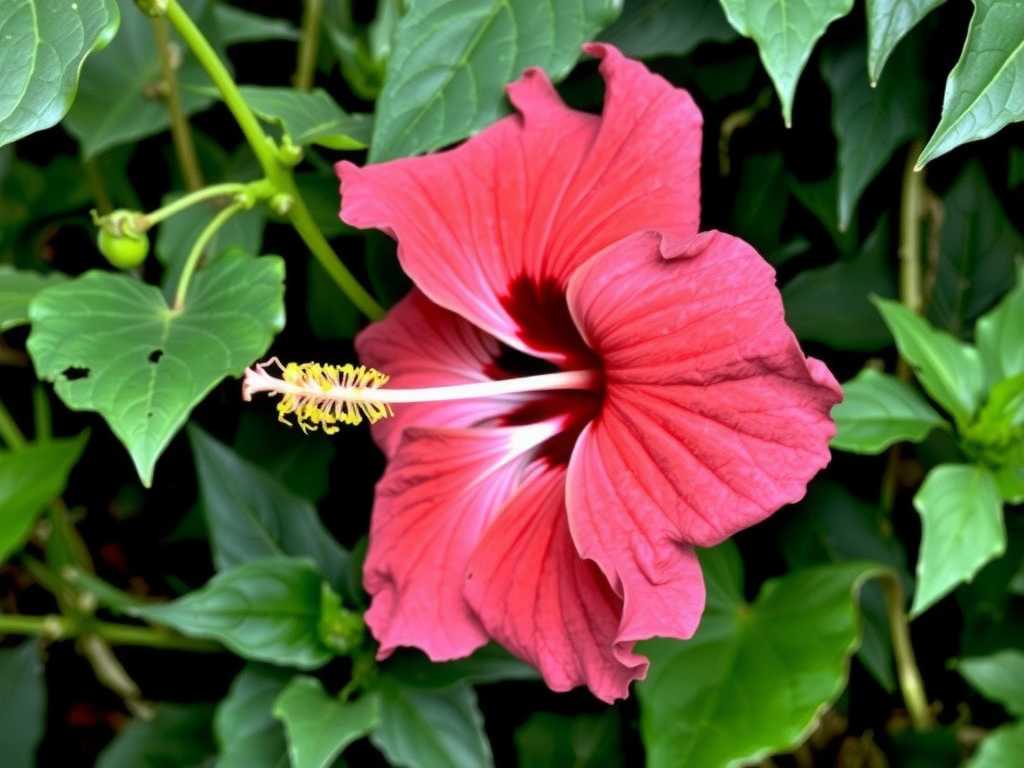
Days 11-14: The Buds Tell the Story. This is where excitement built. Both plants had several fat, well-developed flower buds. As the buds on the treated plants began to crack open and show color, the difference became apparent. The emerging petals on my test plants showed a noticeably deeper, more wine-red hue compared to the buds on an untreated plant elsewhere in my garden, which appeared brighter, almost candy-apple red. By the end of the two weeks, the first full bloom on a treated plant had opened. The color was remarkably more intense—a deeper, richer crimson with a velvety depth that truly lived up to the 'Midnight Marvel' name. The soil pH tricks were working.
Essential Tips and Common Pitfalls to Avoid
My experiment taught me more than just the steps. Here’s how to navigate the process smoothly:
- Test, Don't Guess: Invest in a good soil test. It’s the foundational step for any flower color enhancement strategy.
- Patience is Key: Soil chemistry doesn't change overnight. Aluminum sulfate works in weeks, elemental sulfur over months. Don't reapply prematurely.
- Less is More: It's far easier to lower pH further later than to raise it back after over-acidifying. Stick to recommended doses.
- Watering Consistency: Keep soil evenly moist (not soggy) during the adjustment period. Stressed plants won't bloom well, no matter the pH.
- The Organic Route: For a slower, gentler approach, incorporating peat moss or composted oak leaves can gradually lower pH. This is excellent for long-term maintenance after an initial correction.
Sustaining the Results: A Long-Term View
Adjusting pH isn't a one-time fix. Watering, especially with hard tap water, can gradually raise pH again. I now test my soil pH once a season—in spring. A light, maintenance-level application of an amendment may be needed annually to keep the soil in that sweet spot. This ongoing care is part of my hibiscus color care routine, ensuring every summer is a showcase of vibrant color.
Frequently Asked Questions
Can I use vinegar to change soil pH for my hibiscus? While vinegar (acetic acid) will temporarily lower the pH of water or the immediate soil surface, it is not recommended. Its effect is fleeting and can harm soil microbiology. For a lasting, plant-safe change, use purpose-made soil amendments like sulfur or aluminum sulfate.
Will adjusting soil pH change a pink hibiscus to blue? For hardy hibiscus (Hibiscus moscheutos and hybrids), pH primarily influences the intensity of existing colors (deepening reds, purples) rather than causing a complete color shift from pink to blue, which is more commonly seen in Hydrangea macrophylla. The potential color range is determined by the plant's genetics.
What if my soil is already too acidic? If a test reveals a pH below 5.5, you can gently raise it by incorporating garden lime (calcium carbonate). Follow package instructions carefully. The goal is the same: to reach that optimal 5.5-6.5 range where nutrients are most available for healthy growth and optimal flower expression.
")
Seeing the profound impact of a simple soil adjustment has been one of my most rewarding gardening experiences. It shifted my focus from just feeding the plant to truly understanding and managing its environment. By unlocking the power of soil pH, you move from hoping for vibrant blooms to actively engineering them. The process requires a little science, some patience, and careful observation, but the result—a hardy hibiscus in its most intensely colored, glorious form—is absolutely worth the effort. Your garden’s potential is waiting just beneath the surface.


发表评论