bluename
How to Fix Hibiscus Leaf Tip Burn Mixed with Anthracnose Fungal Spot Symptoms
If your hibiscus leaves show crispy brown tips alongside dark, sunken spots with yellow halos, you are dealing with two problems at once. Leaf tip burn is usually environmental stress. Anthracnose is a fungal infection. The fix starts with removing damaged leaves, correcting watering, improving airflow, and applying a targeted fungicide. I have lost one hibiscus to this exact combination, and I now treat it very differently.

Hibiscus plants are some of the most rewarding flowering shrubs for home gardeners. Their blooms are huge, vivid, and tropical. They work beautifully in containers on a patio or in a sunny garden bed. But they are not low-maintenance houseplants. They need consistent moisture, bright light, good air movement, and regular feeding. When one thing goes wrong, the plant shows it fast. Brown tips and fungal spots often appear together because stressed leaves are more vulnerable to infection.
I grow tropical hibiscus in USDA zone 9 and also overwinter a few in containers indoors. I have dealt with leaf tip burn, anthracnose, spider mites, and root rot. The worst case was a double problem on a large red double-flowered hibiscus. It took me about two weeks to see clear improvement. I will walk you through exactly what I did.
What Leaf Tip Burn and Anthracnose Look Like on Hibiscus
Leaf tip burn starts at the very end of the leaf. The tip turns tan or brown and feels dry, almost papery. Sometimes the edges curl slightly upward. This is often a water or salt problem. It can also come from fertilizer burn, low humidity, hot dry wind, or roots sitting in overly dry soil.
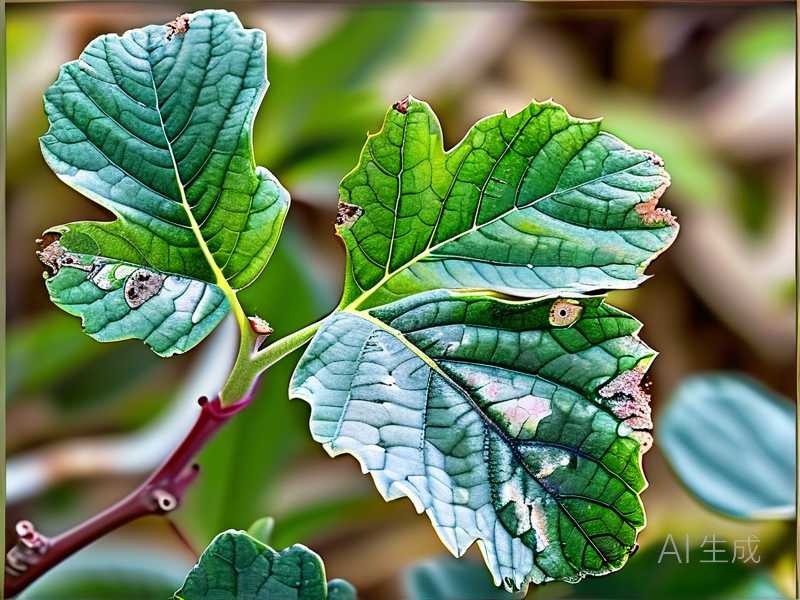
Anthracnose looks different. It shows up as small dark spots that grow into larger brown or black patches. The spots often have a yellow ring around them. In humid conditions, the center of the spot may look wet or sunken. You might also see tiny black fruiting bodies in the dead tissue. These are fungal structures. Anthracnose on hibiscus is caused by Colletotrichum species. The fungus spreads by water splash and loves warm, wet leaves.
When both problems appear on the same plant, many gardeners panic. I did too. I assumed the brown tips were just more fungus. But after close inspection, I realized the tips were dry and crispy. The anthracnose spots were in the middle of the leaves and along the veins. The two symptoms were distinct. That changed my treatment plan.
Simple truth: you cannot fix fungal spots with more water. And you cannot fix leaf tip burn with fungicide alone. You have to treat both causes at the same time.
My Exact Step-by-Step Fix That Worked in Two Weeks
Step 1: Remove the Worst Leaves First
I started by sterilizing a pair of sharp pruning snips with rubbing alcohol. Then I cut off every leaf that had large anthracnose spots or more than half the leaf surface damaged. I also removed leaves with extreme tip burn. I left healthy leaves alone.
Never strip the plant completely. Hibiscus can drop leaves from stress, and removing too many at once can shock it further. I removed about one-third of the foliage in my worst case.
After cutting, I bagged the infected leaves and threw them in the trash. Do not compost them. The fungal spores survive in compost and can splash back onto the plant later.
Step 2: Stop Watering from Above
I used to spray my hibiscus leaves with a hose on hot days. Big mistake. Anthracnose spores spread through water droplets. Overhead watering also leaves the foliage wet at night, which invites more fungus.
After the infection appeared, I switched to watering only the soil surface. I used a watering can with a narrow spout and aimed directly at the base of the plant. I also watered early in the morning so any accidental splashes dried quickly.
If you water in the evening, stop. Wet leaves overnight are a fungal playground. The RHS has good guidance on watering at the base to reduce foliar disease. I learned that lesson the hard way.
Step 3: Check the Soil Moisture Before Anything Else
For the leaf tip burn, I checked my watering routine. I discovered the soil was drying out too much between waterings. The roots were stressed. Then I would overcompensate and flood the pot. That swing between dry and soggy stressed the leaves and made them more prone to infection.
I now use the finger test. I push my finger into the soil to the second knuckle. If it feels dry at that depth, I water deeply until water runs out of the drainage holes. If it still feels moist, I wait one more day.
For container hibiscus, consistency matters more than a fixed schedule. In summer, I check daily. In winter indoors, I check every three to four days.
Step 4: Improve Airflow Around the Plant
My hibiscus was on a sheltered patio with a wall on one side and a large potted palm on the other. Air movement was poor. After I removed the damaged leaves, I moved the pot to a spot with better morning sun and gentle air circulation.
If your hibiscus is indoors, do not crowd it against a wall or between other large plants. A small fan on low speed can help. But avoid blowing hot dry air directly at the leaves for hours. That can worsen tip burn.
Step 5: Apply a Targeted Fungicide
For the anthracnose, I used a copper-based fungicide. Copper is effective against many fungal leaf spots and is widely available at garden centers. I followed the label exactly. I mixed only what I needed and sprayed every 7 days for three applications.
Important: spray in the morning, never in full sun, and never on a windy day. I also tested a small area first. Some hibiscus varieties can be sensitive to copper. If you see leaf yellowing after spraying, stop and switch to a sulfur-based product or neem oil.
I have also used neem oil for mild cases. It is not as strong as copper, but it can slow the spread. For a serious anthracnose outbreak, I trust copper more.
Step 6: Fix the Salt and Fertilizer Problem
Leaf tip burn on hibiscus can come from excess fertilizer salts in the soil. I had been feeding every week with a high-phosphorus bloom booster. Over time, salts built up in the pot. The roots struggled to take up water properly. That caused tip burn even though the soil was moist.
I flushed the soil with plain water. I ran water slowly through the pot for several minutes, letting it drain freely. This leached out excess salts. I did this once and then held off on fertilizer for three weeks.
After the flush, I resumed feeding with a balanced water-soluble fertilizer at half strength. I now feed every two weeks during active growth, not every week.
Step 7: Observe and Adjust for Two Weeks
I marked the calendar and checked the plant every two days. I looked for new spots, changes in leaf tips, and new growth. Within the first week, the spread stopped. No new anthracnose spots appeared. The remaining leaves still had some tip burn, but they did not get worse.
By the end of the second week, I saw small new leaves emerging. They were clean, green, and free of spots. That was the sign the plant was recovering.
I did not expect the old damaged leaves to heal. They will not. Brown tips stay brown. The goal is to stop the damage and let new healthy growth replace the old leaves.
3 Fatal Mistakes New Hibiscus Growers Make
Mistake 1: Watering Too Often
90% of indoor plants die from overwatering. That is not an exaggeration. Hibiscus likes moisture, but it cannot sit in soggy soil. When the roots suffocate, the plant shows stress through the leaves. Tip burn, yellowing, and leaf drop can all come from root damage.
I killed my first hibiscus by watering every day in a pot without good drainage. The soil surface looked dry, so I kept adding water. The bottom of the pot was a swamp. When I finally pulled the plant out, the roots were black and mushy.
The fix is simple. Use a pot with drainage holes. Check the soil at root depth, not just the surface. Water deeply, then let the top inch or two dry before watering again.
Mistake 2: Wrong Light Exposure
Hibiscus needs bright light to flower. But too much harsh afternoon sun in hot climates can scorch leaves and worsen tip burn. Too little light indoors makes the plant weak and more vulnerable to fungal issues.
I made the mistake of moving my container hibiscus from a shady patio straight into full afternoon sun. The leaves developed pale patches and crispy edges within three days. The plant was not acclimated.
The best spot for hibiscus is full morning sun with some protection from intense afternoon heat. If you grow indoors, place it near a south or west-facing window with sheer curtain filtering if the light is too harsh.
Mistake 3: Using the Wrong Pot
The pot matters more than most people think. A pot without drainage holes is a death trap. A pot that is too large holds too much soil and stays wet too long. A black plastic pot in full sun can heat up and cook the roots.
I once repotted a hibiscus into a huge glazed ceramic pot because I thought it would look beautiful. It had one small drainage hole. The plant sulked for weeks. The soil stayed damp. Fungus gnats appeared. The leaves turned yellow with brown tips.
Now I choose pots that are only one to two inches larger than the root ball. I prefer terracotta or unglazed clay because they breathe. If I use ceramic or plastic, I make sure there are multiple drainage holes and I use a lighter, well-draining mix.
Best Light Conditions for Hibiscus
Hibiscus blooms best with at least six hours of direct sunlight per day. Morning sun is ideal. Afternoon sun is fine in mild climates, but in hot regions, some afternoon shade protects the leaves.
If you grow hibiscus indoors, a south-facing window is best. West-facing works too, but watch for heat buildup. East-facing windows can work in summer but often do not provide enough light in winter.
Signs of too much light include bleached leaves, brown scorched patches, and wilting even when the soil is moist. Signs of too little light include leggy growth, few flowers, and dark green leaves that drop easily.
When I move hibiscus outdoors in spring, I harden them off gradually. I start with two hours of morning sun, then add one hour each day over a week. This prevents sunburn.
Watering Guide for Hibiscus with Leaf Problems
The core principle is simple: keep the soil evenly moist but never waterlogged.
In hot weather, container hibiscus may need water every day or every other day. In cool weather, once or twice a week may be enough. The finger test works well. So does lifting the pot. A dry pot feels noticeably lighter.
When watering, soak the soil thoroughly. Water should flow out of the drainage holes. This leaches out excess salts and ensures the entire root ball gets moisture.
Do not let the pot sit in a saucer of water for more than 30 minutes. Empty the saucer after watering. Standing water causes root rot.
For in-ground hibiscus, water deeply once or twice a week during dry spells. Mulch around the base helps retain moisture and keeps the roots cool. Keep the mulch a few inches away from the stem to avoid fungal problems.
Soil and Repotting for Healthier Roots
Hibiscus likes rich, well-draining, slightly acidic soil. A good mix for containers is:
- 2 parts high-quality potting soil
- 1 part perlite or coarse sand
- 1 part compost or aged bark
This mix holds moisture but drains well. Heavy garden soil compacts in pots and suffocates roots.
Repot young hibiscus every one to two years. Mature plants can go two to three years. The best time is early spring before the main growth flush.
When repotting, gently loosen the outer roots. Remove any black, mushy, or dead roots with clean scissors. Use fresh soil. Do not fertilize for the first three to four weeks after repotting. The new soil has enough nutrients, and the roots need time to settle.
I repotted my recovering hibiscus about a month after the fungal issue cleared. The old soil was compacted and salty. Fresh mix made a huge difference.
Fertilizing Hibiscus Without Burning the Leaves
Hibiscus are heavy feeders during active growth. But overfertilizing causes salt buildup and leaf tip burn. The key is to feed lightly and regularly.
I use a balanced water-soluble fertilizer with an NPK ratio around 10-10-10 or 17-5-24. I mix it at half the recommended strength and feed every two weeks from spring through late summer.
In early spring, I add a slow-release granular fertilizer to the soil surface. This gives a steady supply of nutrients without spikes.
Do not fertilize a stressed plant. If your hibiscus has leaf spots or root problems, stop feeding until it shows new growth. Do not fertilize in winter when growth slows. Do not fertilize dry soil. Water first, then feed the next day.
Organic options include fish emulsion, compost tea, and liquid seaweed. They are gentler and less likely to burn roots. However, they may not provide enough phosphorus for heavy blooming. I often use a combination of slow-release granules and occasional liquid feed.
Seasonal Care to Prevent Recurring Problems
Spring
Spring is the time for pruning, repotting, and feeding. I prune my hibiscus hard in early spring, removing about one-third of the old growth. This encourages bushy new growth and more flowers.
I also check for overwintered pests. Spider mites and aphids often hide on the undersides of leaves. A strong spray of water knocks most of them off.
Start fertilizing when new growth appears. If the plant was indoors over winter, harden it off before moving it outside.
Summer
Summer is when hibiscus grows and blooms the most. But it is also when fungal diseases and heat stress peak.
I water more often in summer, but I always check the soil first. I avoid wetting the leaves. I feed every two weeks with a balanced fertilizer.
If temperatures exceed 95°F, I move container plants to a spot with afternoon shade. I also mulch in-ground plants to cool the roots.
Watch for spider mites in hot, dry weather. A fine mist of water on the undersides of leaves can help, but only in the morning so leaves dry by evening.
Fall
In fall, I reduce feeding and slow down watering. The plant is preparing for dormancy. Do not prune heavily in fall. Light removal of dead or damaged wood is fine.
Before bringing potted hibiscus indoors, I inspect them carefully. I spray the leaves with insecticidal soap to kill hitchhiking pests. I also trim back long leggy growth to fit the indoor space.
Gradually move the plant into lower light over a week or two. Sudden changes cause leaf drop.
Winter
Winter is the hardest season for tropical hibiscus. Indoors, the air is dry and light is low. The plant needs less water and no fertilizer.
I keep my indoor hibiscus near a bright window. I water only when the top inch of soil is dry. I do not feed at all from November through February.
Leaf drop in winter is common. Do not panic and overwater. The plant is adjusting. It will push new growth in spring.
Keep the plant away from heating vents and cold drafts. Dry heat causes leaf tip burn. A humidity tray or small humidifier helps.
Common Pests and Problems That Look Like Leaf Tip Burn or Anthracnose
Spider Mites
Spider mites cause stippled yellow leaves that turn bronze and drop. You may see fine webbing. They love hot, dry conditions. Treat with insecticidal soap or neem oil. Repeat every five to seven days for three weeks.
Aphids
Aphids cluster on new growth and flower buds. They secrete sticky honeydew. A strong water spray knocks them off. Insecticidal soap works well.
Root Rot
Root rot comes from overwatering or poor drainage. Leaves turn yellow and wilt even when the soil is wet. The roots are brown and mushy. Remove affected roots, repot in fresh soil, and reduce watering.
Nutrient Deficiency
Yellow leaves with green veins often point to iron deficiency. This is common in alkaline soil. Use a fertilizer with chelated iron or lower the soil pH with sulfur.
Salt Burn
Brown leaf tips with a white crust on the soil surface indicate salt buildup. Flush the soil with plain water. Reduce fertilizer strength and frequency.
What I Learned from Losing My First Hibiscus
I killed my first hibiscus about eight years ago. It was a beautiful yellow variety in a small pot. I watered it every single day because I thought tropical plants needed constant moisture. The leaves turned yellow, then brown at the tips, then dropped. I blamed the sun. Then I blamed the fertilizer. I never once checked the roots.
When I finally pulled the plant out, the smell was unforgettable. The root ball was a wet, rotting mess. I had loved the plant to death.
My second hibiscus struggled with fungal leaf spots. I sprayed neem oil every few days, but the spots kept spreading. It turns out I was watering overhead every evening. The leaves never dried. I was creating the perfect environment for anthracnose.
The third one taught me about salt buildup. I fed it weekly with a bloom booster and never flushed the soil. The tips burned, and I thought it was sunburn. A simple soil flush fixed it in weeks.
You do not need to repeat my mistakes. Pay attention to the plant. It tells you what it needs. Brown crispy tips mean moisture or salt stress. Dark spreading spots mean fungus. Treat each problem for what it actually is.
FAQ
Can a hibiscus recover from leaf tip burn and anthracnose at the same time?
Yes, if you act early. Remove the worst leaves, fix watering, improve airflow, and apply a copper fungicide. The damaged leaves will not heal, but new growth can come in clean. My plant showed new healthy leaves within two weeks.
Should I cut off all leaves with brown tips?
No. If only the tips are brown, the rest of the leaf is still making food for the plant. You can trim just the brown tip with clean scissors. Remove the whole leaf only if most of it is damaged or if it has large fungal spots.
How often should I apply fungicide for anthracnose on hibiscus?
For copper-based fungicides, apply every 7 to 10 days for three applications. Always read the label for your specific product. Stop if you see leaf yellowing or burning. For prevention, avoid overhead watering and keep leaves dry at night.
Is neem oil or copper better for hibiscus anthracnose?
Copper is generally stronger for active fungal infections. Neem oil is better for mild cases or as a preventive. Both can be effective. Test either product on a small area first, since hibiscus can be sensitive.
Why does my hibiscus keep getting leaf tip burn even though the soil is wet?
The roots may be damaged from overwatering or salt buildup. Damaged roots cannot take up water efficiently, so the leaf tips dry out. Flush the soil with plain water, improve drainage, and reduce fertilizer for a few weeks.
Fix the stress, stop the fungus, and let the plant push new growth. AHS also recommends cultural controls as the first line of defense against fungal leaf diseases. Healthy roots and dry foliage solve most hibiscus problems.