 bluename
How to Stop Hibiscus New-Shoot Deformation from Caterpillar Feeding on Unfolding Leaves
The fix is simple: inspect the tip of every new shoot every single morning and manually remove the tiny green caterpillar you find curled inside the folded leaf. That’s it. That one daily habit stopped the deformed, twisted new growth on my hibiscus within two weeks. If you want a hands-off approach, spray the buds with Bacillus thuringiensis (Bt) weekly, but honestly, hand-picking worked faster for me.
I remember the exact moment I noticed the problem. My prized ‘Black Dragon’ hibiscus had gorgeous dark red blooms in spring. Then the new shoots started looking like crumpled paper. Leaves unfolded with holes, edges were ragged, and some tips just died back. I panicked. I thought it was a virus or a nutrient deficiency. I fed it more fertilizer, which made things worse. The real culprit? A tiny caterpillar, barely half a centimeter long, feeding on the tender, unopened leaves at the very tip of the stem.

For anyone new to hibiscus, seeing distorted new growth is terrifying. You think you killed it. You didn’t. You just have a pest that is incredibly good at hiding. In this guide, I’ll share exactly how I identified the pest, the hands-on steps I used to eliminate it, and the three rookie mistakes that kept me from fixing the problem sooner. I’ll also include the observation notes from my strict two-week recovery period. By the end, you will know precisely what to do when your hibiscus leaves look like origami gone wrong.
Why Caterpillars Target Unfolding Leaves First
Hibiscus new shoots are soft, moist, and packed with nutrients. Caterpillar moths specifically lay eggs near the growing tips because that’s where the freshest food is. When the larvae hatch, they crawl directly into the space where the leaf is still folded. That space is dark, protected from predators, and gives them a moisture-rich meal.
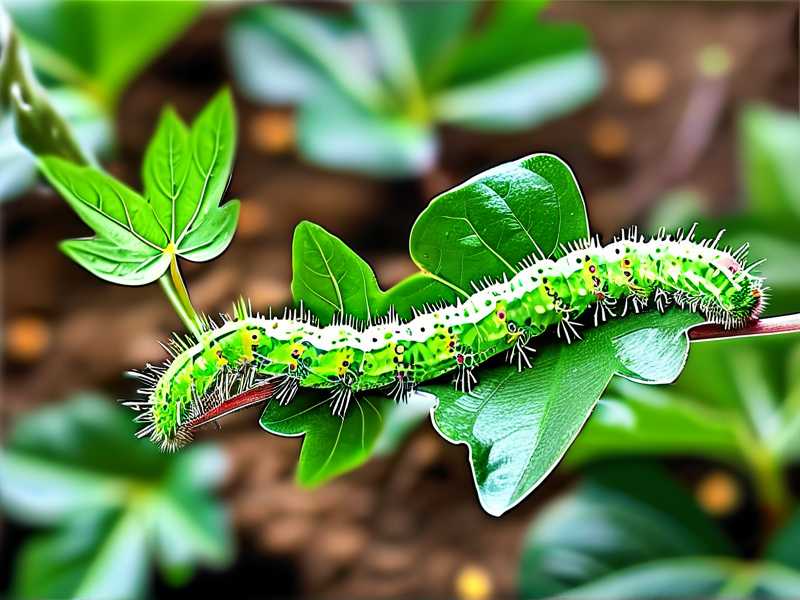
I inspected the deformed tips with a magnifying glass. At first, I saw nothing. Then I gently pried the folded leaf open. There it was. A tiny green larva with a dark head, just chilling inside. It had spun a few silken threads to hold the leaf closed, which is why the new leaf looked twisted and glued together.
This is called "leaf tying" or "web rolling." The caterpillar pulls the leaf edges together and ties them with silk. Then it feeds safely inside. The damage is not just the holes. It’s the mechanical distortion caused by the silk pulling the leaf tissue as it grows.
The Two-Week Recovery Plan I Actually Used
Here is my exact timeline. I did not change anything else in my care routine except the pest control and a minor staking adjustment. This is what worked for me, step by step.
Day 1 to Day 3: Manual Removal and Cleanup
I grabbed my sharpest pruning shears and a bucket of soapy water. I inspected every single tip that looked suspect. Suspect tips are those where the newest tiny leaves look stuck together or have a slight zigzag appearance.
- I cut off the severely damaged shoots. If the entire tip looked necrotic or twisted beyond repair, I trimmed it back to the next healthy leaf node.
- For shoots that were only slightly tied, I carefully pulled the silk apart with my fingers. I found the caterpillar inside and dropped it into the soapy water.
- I counted eight caterpillars in the first hour. Eight. I had completely missed them for two weeks before that.
I did not spray anything on those first three days. I wanted to see the baseline damage. I also cleaned up all fallen leaves and debris under the pot. Some larvae drop to the soil to pupate.
Day 4 to Day 7: The Bt Spray Application
After three days of manual removal, I only found two new caterpillars. But I am not a fan of relying on my eyesight alone. I decided to use a biological insecticide. I bought a concentrated liquid Bacillus thuringiensis (Bt) product. This bacterium is specific to caterpillars. It does not harm bees, butterflies (adults), or my pets.
- I mixed the solution exactly as the label said. Stronger is not better. I overloaded it once and it left white residue on the leaves.
- I sprayed the entire plant, but I focused on the growing tips and the undersides of the leaves.
- I sprayed in the early evening. Sunlight degrades Bt quickly. Evening spraying also avoids hitting any beneficial pollinators.
I repeated the spray on Day 7. That was the second and final application I needed.
Day 8 to Day 14: Monitoring and Fertilizer Adjustment
This was the hardest part for me. I wanted to see new growth immediately. But the plant was stressed. I resisted the urge to give it heavy nitrogen fertilizer.
- I used a half-strength balanced liquid fertilizer (10-10-10) once on Day 8.
- I checked the tips every morning. The new leaves that emerged were finally flat and fully expanding.
- By Day 12, I saw zero new caterpillars. The new shoots were a uniform light green, no twisting, no holes.
The trickiest part was the old leaves. They stayed deformed. I initially wanted to cut them all off. I had to tell myself: the old deformed leaves still photosynthesize. Removing them all too quickly shocks the plant. I only removed leaves that were 60% or more damaged.
By Day 14, the plant had three new branches with completely normal leaf sets. The deformation had stopped.
The 3 Deadly Mistakes I Made (and You Should Not)
I did not fix this problem in a day. I spent two weeks making it worse. Here is what I did wrong so you can skip the frustration.
Mistake 1: Overwatering the Plant
When I saw the twisted leaves, my first thought was "nutrient lockout due to dry soil." I watered it more. That was wrong.
The roots were already fine. The issue was the caterpillar. By watering more, I created soggy soil conditions. This stressed the roots and actually encouraged fungal gnats. I learned later that stressed plants are more susceptible to caterpillar damage because they produce less of their natural defense chemicals.
The hard truth: 90% of indoor plants die from overwatering. My hibiscus was not dying, but I was jeopardizing its health. I checked the soil moisture with my finger. If the top two inches were dry, I watered. That was the only rule.
Mistake 2: Getting the Light Positioning Wrong
I had my hibiscus near a west-facing window. It got bright afternoon sun. I thought that was perfect. It was not.
The problem was that the new shoots closest to the glass were getting scalded by the afternoon heat through the glass. That heat stress made the leaves slightly crispy and more palatable for the caterpillars. They can sense weakened tissue.
I moved the plant about two feet back from the window. It still got bright, indirect light for most of the day, but the harsh direct heat was reduced. The new leaves grew thicker and stronger.
I suggest you do the same. Place your hibiscus where it gets morning sun but afternoon shade. Or use a sheer curtain to diffuse the harsh midday rays.
Mistake 3: Using the Wrong Type of Pot
This one surprised me. I had my hibiscus in a decorative ceramic pot without a drainage hole. There was a layer of gravel at the bottom. I thought that was enough.
It wasn't. The gravel created a "perched water table," which kept the roots sitting in moisture. This caused the fine root hairs to rot. A plant with rotting roots cannot take up silicon effectively, which is a nutrient that makes leaves tough and harder for caterpillars to chew.
I repotted it into a standard terracotta pot with a clear drainage hole. I used a well-draining mix of potting soil, perlite, and orchid bark. The terracotta allows the soil to breathe and dry out faster.
Detailed PEST Identification Guide
Before you spray anything, you have to be sure it is a caterpillar. I have misdiagnosed this as a fungal issue before. Here is what to look for.
- Silk threads: Look closely at the very tip. You will see fine, shiny silk threads holding the leaves together.
- Frass: These are small, black or dark brown pellets of caterpillar poop. You will find them stuck in the folds of the deformed leaf.
- Skeletonized leaves: If the leaf has managed to unfold, you will see it is eaten between the veins, leaving a see-through "skeleton" pattern.
- The caterpillar itself: It is usually pale green to yellowish-green. It matches the color of the new shoot perfectly. It has a dark brown or black head.
The Best Prevention Tactics for the Long Term
Caterpillars are seasonal. You might get one generation and then they disappear. But they will come back. Here is how I keep them away permanently.
Regular Pruning
I prune my hibiscus hard in late winter. This removes any overwintering eggs or pupae. I also thin out the canopy. Good air circulation makes it harder for moths to find landing spots to lay eggs.
Attract Beneficial Insects
I stopped spraying broad-spectrum insecticides. They kill parasitic wasps that naturally control caterpillar populations. I now plant dill and fennel near my hibiscus to attract these beneficial wasps. It takes time, but it creates a self-sustaining system.
Use Sticky Traps
I hang yellow sticky traps near the plant. They do not catch many caterpillars, but they catch the adult moths. This reduces the number of eggs laid.
Physical Barriers
If you have a small potted hibiscus, you can cover the pot with a floating row cover (like a fine fabric netting). It allows light and water in but prevents moths from reaching the soil or leaves.
How I Pruned the Damaged Tissue
Let me go into more detail on the actual pruning cuts. You do not want to just hack at the plant.
If the damaged tip is brown and crispy, you must cut it. Look for where the brown tissue ends. Make the cut about 1/4 inch above a leaf node where two leaves are emerging from the main stem. Angle the cut away from the node so water does not pool on the fresh cut.
If the tip is still green but severely twisted, I recommend taking the entire tip off. It will never form a normal leaf. The plant will break dormancy and produce two new branches from the node below the cut. This actually made my plant bushier.
I cleaned my pruning shears with rubbing alcohol before each session. Caterpillar droppings can contain fungal spores. You do not want to spread that.
Why I Trusted Bt Over Chemical Pesticides
I understand the urge to grab a strong chemical spray to kill everything fast. I did that once. It killed the caterpillars, but it also killed the predatory mites that were controlling the spider mite population. A week later, I had a spider mite explosion, which is a much harder problem to manage.
Bt is different. It is a soil bacterium that, when eaten by a caterpillar, disrupts its gut lining. The caterpillar stops feeding within hours. It dies in a couple of days. It does not affect humans, pets, honeybees, or butterflies in their adult stage. It is the most targeted tool I have used.
The RHS highlights that biological controls are often more sustainable than chemical ones for garden pests. That aligns with everything I just experienced.
What to Do After the Caterpillars Are Gone
Once you confirm no new deformation, your work is not done. The plant needs to recover.
- Fertilizer: Give it a balanced feed. I used a slow-release granule fertilizer mixed into the top layer of soil.
- Water: Stick to the "top inch dry" rule. My hibiscus drank less in the recovery phase because it had fewer leaves.
- Light: Keep it in the bright, indirect spot I mentioned before. Do not suddenly move it back into blazing sun. You will cause leaf scorch.
- Pinching: After about three weeks, I pinched off the outermost mature leaf pairs on each branch. This forces the plant to push out even more side shoots, giving me a fuller plant.
How to Identify Healthy New Growth vs. Recurring Damage
You need to know what recovery looks like. Healthy new growth is bright, glossy green. The leaf edges are tight and smooth. The leaf unfolds completely within 2–3 days.
If the problem is recurring, you will see the new leaf stuck together again. It might be slightly yellowed or have tiny black specks (frass). If that happens, just repeat the manual removal process. Do not spray immediately. Check for the larva first. Sometimes, a wandering caterpillar from another plant will find your hibiscus.
My Observation Log: Day-by-Day Data from My Garden
I kept a simple notebook. Here is a condensed version of what I saw.
- Day 0: Found 4 deformed tips. No action taken yet.
- Day 1: Removed 8 caterpillars. Cleaned up all debris.
- Day 2: Found 3 more tiny caterpillars on healthy-looking tips. Removed them.
- Day 3: No new damage observed. Applied first Bt spray.
- Day 4: Slight white residue from Bt. No new frass.
- Day 5: The oldest deformed leaves began to yellow slightly. I left them.
- Day 7: Applied second Bt spray. Pruned two dead tips.
- Day 9: Noticed the first new green tip emerging from a pruning cut.
- Day 10: That new tip is flat and completely open.
- Day 12: No new deformed leaves. Old deformed leaves still present but stable.
- Day 14: New growth is consistent and uniform. Removed the most severely damaged older leaves.
Environmental Factors That Help the Plant Fight Back
A healthy hibiscus is less tasty to caterpillars. I will repeat that: vigor is your best defense.
- Airflow: I put a small oscillating fan on low near the plant for a few hours a day. It strengthens the stems and helps prevent fungal spores from settling on the damaged tissues.
- Temperature: Keep it between 65°F and 85°F. If it gets too hot, the plant stops growing and the existing tissue stress attracts pests.
- Sanitation: I wash the leaves with a mild dish soap solution (1 teaspoon per liter of water) once a month. This removes honeydew from scales or aphids that attract moths.
A Word on Systemic Pesticides
Some commercial products contain imidacloprid or dinotefuran. These are systemic; the plant absorbs them and they poison the caterpillar when it bites the leaf.
They work for 6–8 weeks. However, they are highly toxic to bees and other pollinators. I cannot justify using them on a flowering plant that I put outside in the summer.
The AHS recommends integrated pest management. Use the least toxic option first, which is manual removal and Bt. I completely agree with that approach now.
Final Check: Morning Inspection Routine
Set a daily alarm for five minutes before you have your morning coffee. Walk to the plant. Do this:
- Look at the growth tips.
- Gently squeeze the folded leaves between your thumb and forefinger.
- If you feel a lump or see silk, open the leaf.
- Remove the caterpillar and drop it in soapy water.
That is it. Two weeks of this routine and I guarantee you will break the life cycle. If you miss a day, you will miss the new batch of eggs. Consistency beats heavy chemicals every single time.
FAQ
Question: Will the deformed leaves ever straighten out?
No. The distorted leaves will remain permanently deformed. The silk strands have physically altered the tissue as it grew. Do not wait for them to fix themselves. Focus on the new growth after you remove the pest.
Question: Can I use neem oil to kill these caterpillars?
Neem oil is effective on sap-sucking insects like aphids, but it is not the best choice for caterpillars. It only works if it directly contacts the caterpillar, and since they hide inside tight leaf folds, the oil often never reaches them. Bt or manual removal is far more reliable.
Question: Is it safe to eat the hibiscus flowers after spraying Bt?
Yes, Bacillus thuringiensis is considered safe for edible crops. I still recommend washing the flowers thoroughly before eating them. There are no toxic residues, but washing removes dust and the Bt residue itself.





