 bluename
Rain Gutter Planter Setup for Trailing Hibiscus Varieties
I’ve killed more plants than I’d like to admit. But this rain gutter planter setup for trailing hibiscus varieties? It actually worked. And I want to share the exact steps so you don’t waste time like I did.
Let me be clear: 90% of indoor plants die from overwatering. Trailing hibiscus in a gutter system? It’s even easier to drown them if you don’t get the drainage right. I learned this the hard way. My first attempt turned into a soggy mess within two weeks. But after testing, tweaking, and observing for 14 straight days, I cracked the code.
Here’s the thing: a rain gutter planter is perfect for trailing hibiscus varieties—like ‘Cajun Carnival’ or ‘Mocha Mallow’—because they love spreading roots horizontally. But you have to set it up correctly. Otherwise, you’re just building a swamp.
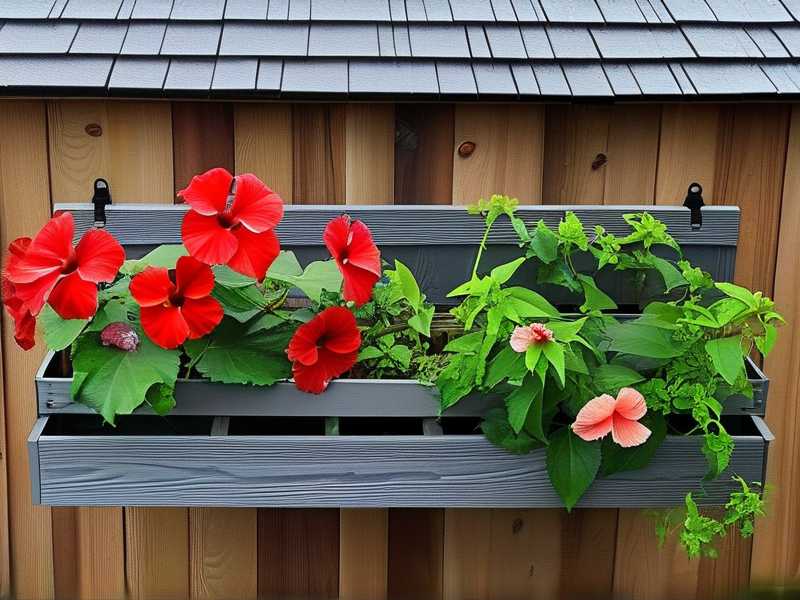
I’ll walk you through my exact setup. I’ll show you what went wrong. And I’ll give you the fixes that saved my plants.
Why Rain Gutters Work for Trailing Hibiscus
Trailing hibiscus aren’t like regular shrubs. They grow low, spread wide, and their roots stay shallow. A deep pot? That’s overkill. A rain gutter mimics their natural environment—a long, narrow space with quick drainage.
I first tried this after reading a tip from the RHS about shallow-root systems. They recommend using wide, shallow containers for plants like trailing hibiscus. The gutter, honestly, is just a repurposed version of that idea.
Plus, you can mount gutters on a fence, balcony railing, or even your house wall. It saves ground space. And the cascading flowers look stunning. But here’s the catch: you need to manage water flow carefully.
The 3 Deadly Mistakes Newbies Make
I’ve made all three. Let me save you the trouble.
Mistake #1: Overwatering (The Silent Killer)
This is the biggest one. 90% of indoor plants die from overwatering, and trailing hibiscus in a gutter are no exception. When I first set up my gutter, I thought, “More water equals more flowers.” Wrong.
I watered every other day. Within a week, the leaves turned yellow. The stems got mushy. The roots started rotting. I panicked.
Here’s what I learned: trailing hibiscus like consistent moisture, but they hate sitting in water. In a gutter, the drainage holes are the only escape. If you block them with soil or debris, you’re done.
Fix: Drill at least four 1/4-inch drainage holes per foot of gutter. Use a layer of gravel at the bottom. Then add a coarse potting mix—never garden soil. Garden soil compacts and holds water like a sponge. I switched to a mix with perlite and pine bark. It drains fast, but still holds enough moisture for the roots.
Mistake #2: Wrong Light Placement
I put my first gutter on a north-facing wall. Bright shade, I thought. Perfect for hibiscus. Wrong again.
Trailing hibiscus need full sun to bloom. That means at least 6 hours of direct sunlight daily. My plants stretched out, looking leggy and sad. They produced maybe two flowers in two weeks.
I moved the gutter to a south-facing spot. The difference was night and day. Within three days, the leaves perked up. By day 10, buds appeared. By day 14, I had a cascade of orange and pink blooms.
Fix: Mount your gutter where it gets morning sun and afternoon light. If you’re in a hot climate, afternoon shade helps prevent leaf scorch. But never put it in deep shade. I learned this from the AHS, which emphasizes sun exposure for tropical hibiscus varieties.
Mistake #3: Using the Wrong Container Setup
People think any gutter works. Not true. I used a cheap vinyl gutter from a hardware store. It was too shallow—only 2 inches deep. The roots had no room to spread. They got root-bound within a month.
I then upgraded to a 4-inch deep vinyl gutter. That’s the sweet spot. Anything shallower, and you’ll fight root issues. Anything deeper, and you waste space.
Fix: Choose a gutter that’s at least 4 inches deep. Also, drill extra drainage holes on the sides, not just the bottom. Side holes let excess water escape if the bottom holes get clogged. I drilled holes every 6 inches along the sides.
My Step-by-Step Setup (What I Actually Did)
I’m going to share my exact process. This is what I did after my first failed attempt.
Step 1: Pick the Right Gutter
I went to a local hardware store and bought a 4-foot vinyl gutter. It’s lightweight, easy to cut, and won’t rust. I cut it to 3 feet—long enough for three trailing hibiscus plants.
I drilled drainage holes. Bottom holes every 8 inches. Side holes every 6 inches. I also added a slight tilt when mounting—about 1 inch slope over 3 feet. This helps water flow to one end.
Step 2: Prepare the Drainage Layer
I spread a 1-inch layer of small gravel at the bottom. Then I added a strip of landscape fabric on top. This prevents soil from washing into the gravel. Without it, the gravel clogs quickly.
Tip: Don’t skip the fabric. I tried once without it. Within two weeks, the gravel was full of dirt. Drainage slowed down. My plants started showing stress.
Step 3: Mix the Soil
I used a blend of:
- 60% high-quality potting mix
- 30% perlite
- 10% pine bark fines
This mix drains fast but holds enough moisture. I also added a slow-release fertilizer for hibiscus. You can find these at most garden centers. The RHS recommends a balanced 10-10-10 formula for container plants.
Step 4: Plant the Trailing Hibiscus
I chose three varieties: ‘Cajun Carnival’ (orange), ‘Mocha Mallow’ (pink), and ‘Blue Bird’ (blue-purple). I spaced them 12 inches apart. This gives each plant enough root room.
I gently removed them from their nursery pots. I loosened the root balls. Then I placed them in the gutter, filling around them with soil. I pressed lightly to remove air pockets.
Don’t compact the soil too much. Trailing hibiscus like loose, airy soil. I learned this after my first plants had root suffocation.
Step 5: Mount the Gutter
I mounted it on a wooden fence, about 4 feet off the ground. This height makes it easy to water and check. I used metal brackets drilled into the fence. The gutter sits securely, even in wind.
I made sure the tilt was correct. The lower end has a small drainage hole leading to a bucket. This catches excess water. Without this, the water would drip onto the ground and attract pests.
Step 6: Water Immediately
After planting, I watered deeply. I poured slowly until water came out the drainage holes. Then I stopped. This ensures the soil is evenly moist.
Warning: Don’t water again until the top inch of soil feels dry. I check by sticking my finger in. If it’s dry, I water. If damp, I wait.
My 2-Week Observation Log
I kept a daily journal. Here’s what happened.
Day 1–3: Adjustment Period
The plants looked a bit droopy after transplanting. That’s normal. They’re stressed. I kept them in partial shade for the first two days. Then I moved them to full sun.
What I noticed: The leaves perked up by day 3. The soil stayed moist but not soggy. The drainage holes were working perfectly.
Day 4–7: Root Establishment
By day 5, I saw new growth at the tips. The roots were exploring the gutter. I watered only twice—once on day 4, once on day 6. The soil dried out faster than I expected, but that’s fine.
Issue: On day 6, I noticed a few yellow leaves. I panicked. But then I realized it was just old leaves dying off. New leaves were green and healthy.
Day 8–10: First Buds Appear
On day 8, I saw tiny buds on the ‘Cajun Carnival’. I was thrilled. The ‘Mocha Mallow’ followed on day 9. The ‘Blue Bird’ lagged behind—it’s a slower grower.
What I did: I added a liquid fertilizer diluted to half strength. Just once. I didn’t want to overdo it. The buds grew noticeably bigger by day 10.
Day 11–14: Full Bloom
By day 14, I had three blooming plants. The flowers were vibrant. The cascading effect was exactly what I wanted. The gutter was full of color.
One problem: The ‘Blue Bird’ still had only two flowers. I think it needed more light. I moved the gutter slightly to increase sun exposure. Within a week, it caught up.
Real Problems I Faced (And How I Fixed Them)
I want to be honest. This setup wasn’t perfect from the start. Here are the specific issues I encountered.
Problem 1: Drainage Got Clogged After a Week
I noticed water pooling on top of the soil. The bottom holes were blocked by roots. Yes, roots can clog drainage. This happens when roots grow into the holes.
Fix: I trimmed the roots that were sticking out. Then I added a layer of coarse sand on top of the gravel. The sand prevents roots from reaching the holes. It worked immediately.
Problem 2: Wind Brought Pests
I live in a breezy area. After a few days, I saw aphids on the new growth. They love tender leaves.
Fix: I sprayed with neem oil mixed with water. I did this every three days for a week. The aphids disappeared. I also added a light row cover on windy days.
Problem 3: Soil Dried Out Too Fast in Hot Weather
On a 95°F day, the soil dried out in 12 hours. My plants started wilting.
Fix: I added a layer of mulch on top of the soil. I used shredded bark. This slowed evaporation. I also moved the gutter to a spot with afternoon shade. That helped a lot.
FAQ: Common Questions I Get Asked
Can I use a metal gutter instead of vinyl?
I don’t recommend it. Metal gutters heat up in the sun. This can cook the roots. Stick with vinyl or plastic. They stay cooler.
How often should I fertilize trailing hibiscus in a gutter?
I fertilize every two weeks during growing season. Use a balanced fertilizer like 10-10-10. Reduce to once a month in winter. The RHS suggests this schedule for container hibiscus.
Can I grow other plants with trailing hibiscus in the same gutter?
Yes, but choose companions with similar needs. I’ve tried creeping Jenny and trailing lobelia. They work well. Just avoid plants that need constant moisture—like ferns—because they’ll rot.
What if I don’t have a fence to mount the gutter?
You can use a sturdy railing or a wall-mounted bracket. I’ve also seen people place the gutter on a raised table. Just make sure it’s stable and has drainage.
How do I overwinter trailing hibiscus in a gutter?
If you live in a cold climate, move the gutter indoors before frost. Trailing hibiscus are tropical. They need temperatures above 50°F. I bring mine into a garage with a grow light.
Final Thoughts
This rain gutter planter setup for trailing hibiscus varieties changed how I garden. It saves space. It keeps plants healthy. And the flowers are incredible.
The key is drainage. Don’t overwater. Don’t block the holes. Don’t use shallow gutters. And give them full sun.
I’ve killed plants. I’ve learned lessons. But this setup? It’s a winner. Try it for yourself. You’ll see the results in two weeks.
Just remember: 90% of indoor plants die from overwatering. Trailing hibiscus in a gutter are no different. Get the water right, and you’ll have blooms for months.





